Blog Post by EverythingWingChun customer, John Cook. – Thanks, John!!
Ok! Here are the parts needed to make your own wing chun spring-arm trainer. This is my 2nd attempt and both turned-out awesome! I built my 2nd spring-arm in one evening after work, it doesn’t require an engineers degree.
 First you’ll need to order the spring, part # AUC30 from Access Electronics in Bushnell, NE. (Im sure they aren’t the only suppliers for this spring, it’s a CB antenna spring). They are $15 each and $10 for shipping. They sent me 2 and only charged $10 for shipping them both to me, a good deal I think. The spring is threaded on both ends almost 1″ deep with 3/8-24 threads. You will need a 3/8″ lock washer, 2 3/8-24 nuts, 2 fender washers 3/8″ X 1 1/4″, a 38-24 X 1″ bolt, and a 4″ length of 3/8-24 allthread rod. This allthread rod size is not a normally stocked item in the major box stores, you may need to find a machine shop that has it, I did. That same machine shop also cut and bent 2 pieces of stainless steel 3″ X 6″ 3/16” at a 45 degree angle (with 3″ on each side of the bend) as shown in the picture. They cut and bent the two steel pieces of stainless steel and cut the two 3/8-24 rods for $22, so $11 for one spring arm, a good deal. (Remember, stainless steel looks great when buffed-out but it is very hard to drill. Using mild steel and painting it is not a bad idea.) The arm is white UHMW, 18 3/4″ long X 1 1/2″ diameter. I paid $40 for a 4′ piece of scrap, enough for 2 arms easily. Buying it about 4″ longer is a good idea in case you make a mistake when drilling the hole for the allthread, you can simply drill the other end and cut off your mistake, I did this on my 1st arm. Using UHMW in 1 1/4″ diameter intead of 1 1/2″ would also work, so would using Delrin or one of the many Nylons. I did not have access to these materials but I’m sure they would be OK.
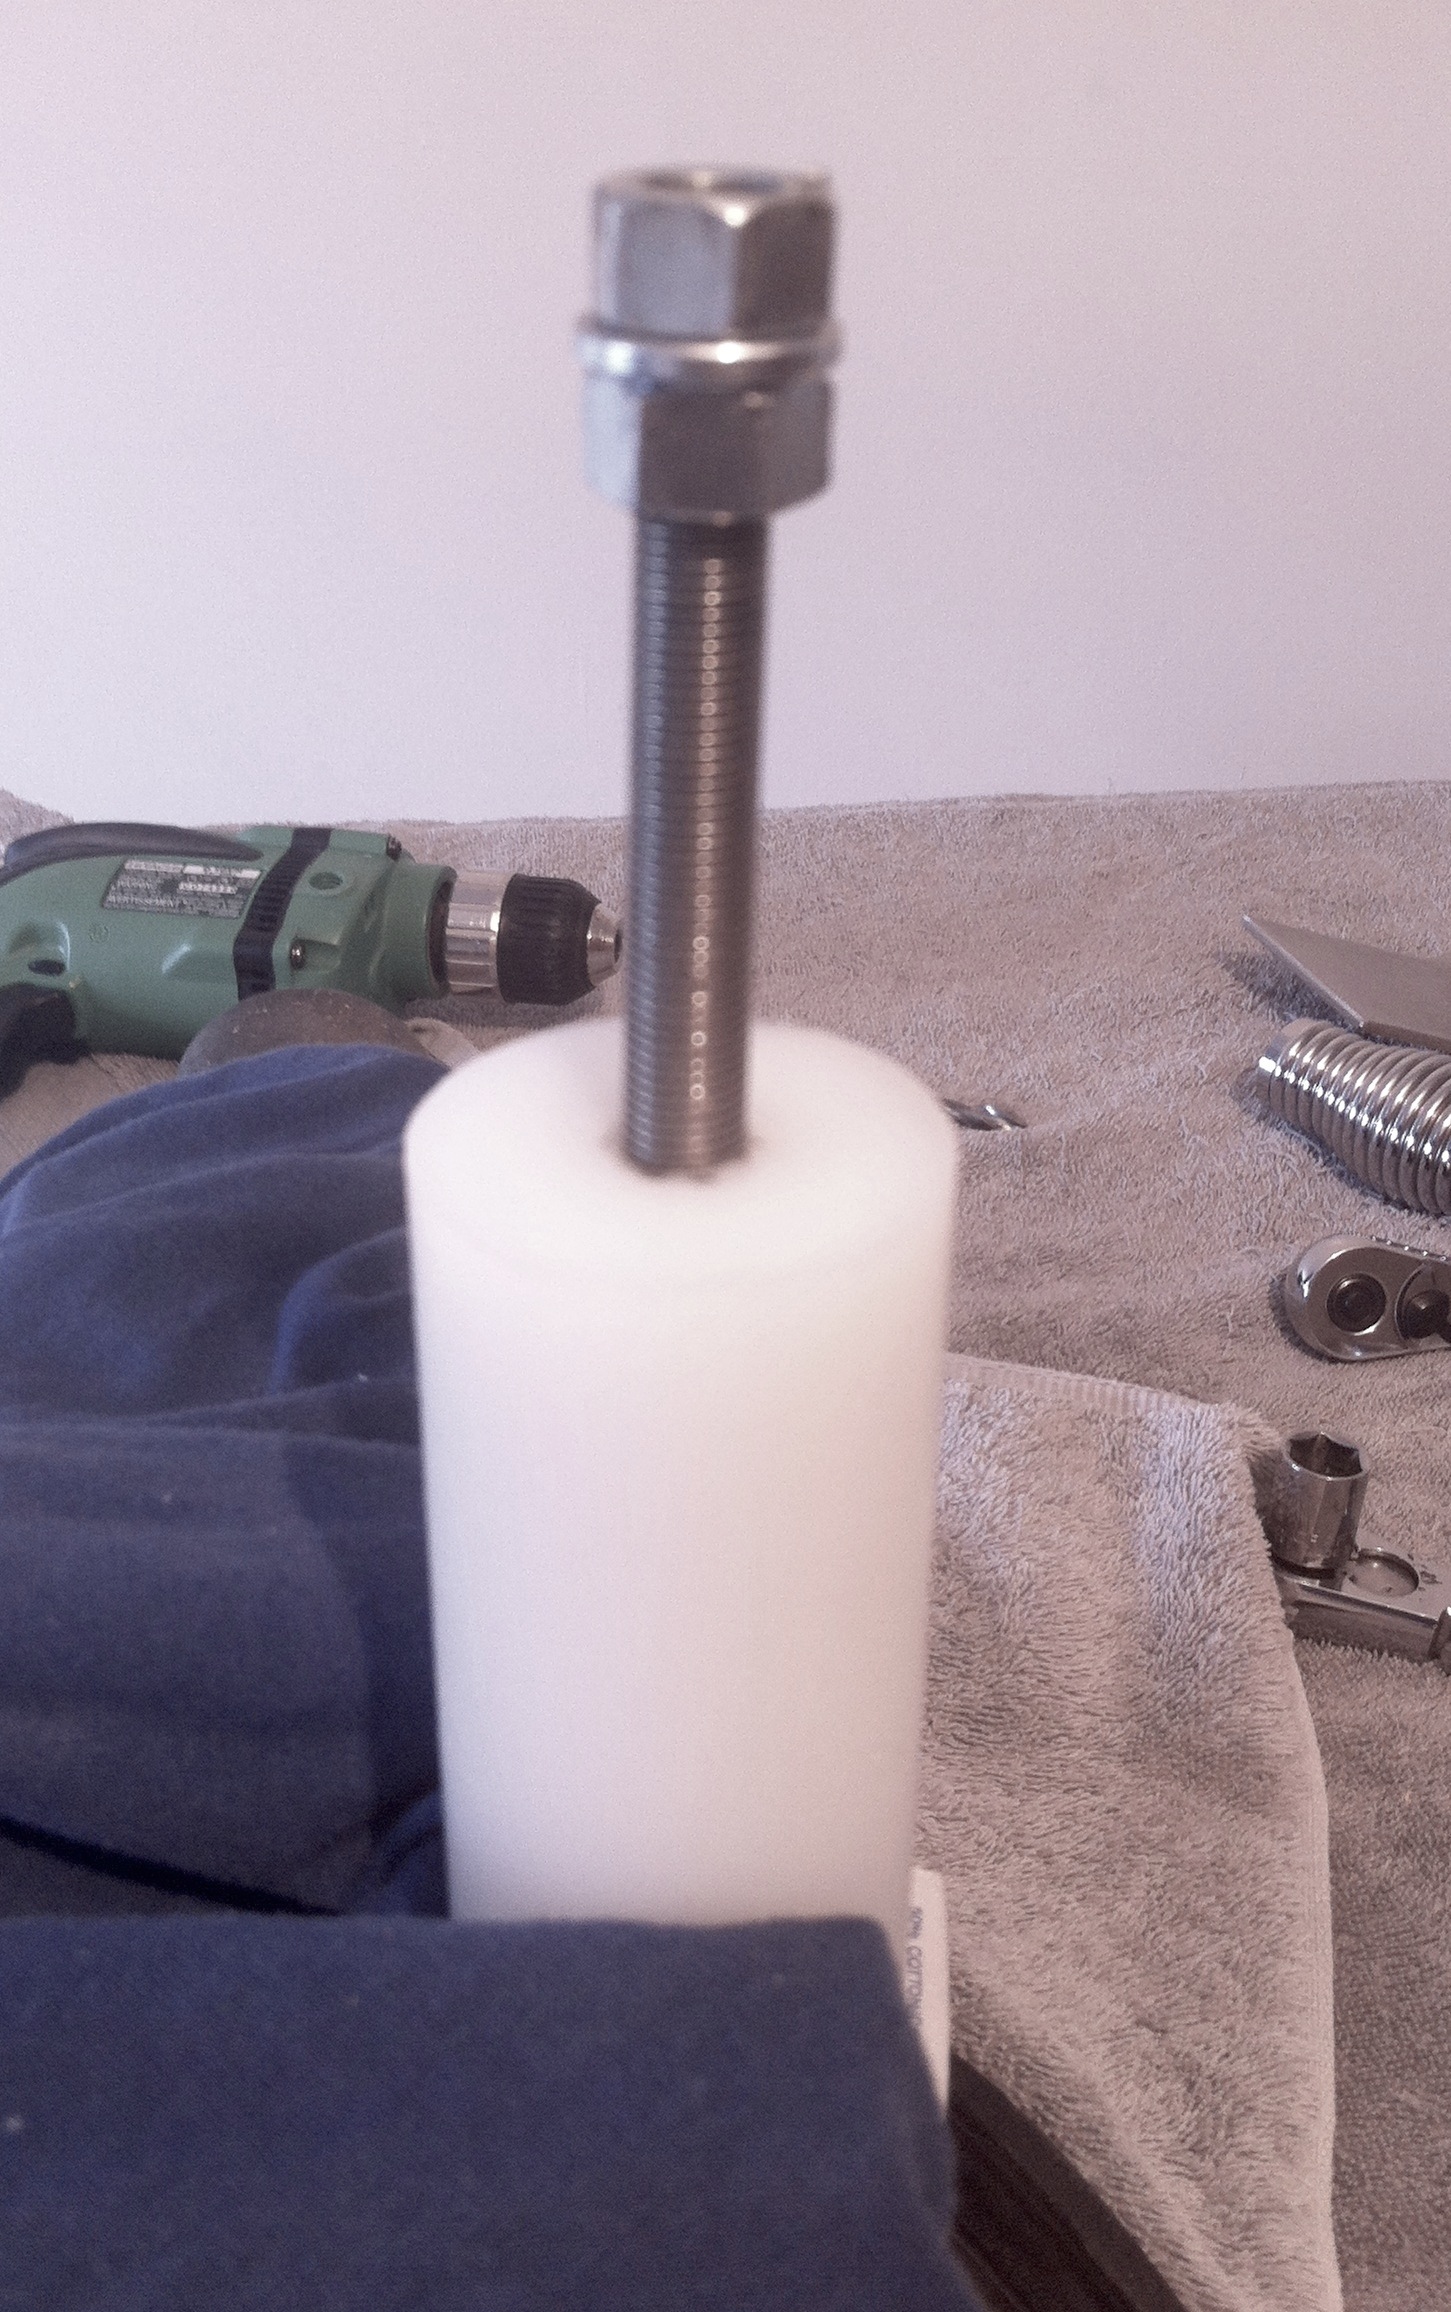 2nd step. This is a picture of the 1 1/2″ diameter UHMW plastic rod in a vice. You can see two nuts (3/8-24 thread) and a lock washer on the end of your 4″ piece of 3/8-24 allthread. This how you “screw” the allthread into the plastic rod. It cuts it’s own threads as you “screw” it into the 4″ deep hole you drilled into the end of the rod. I used a drill bit size of 21/64 but a 11/32 will work OK too. Be sure and drill the hole at least 4″ deep and get it as “square” as possible. I sorta chamfered the edge of the 21/64 rod hole with a razor-knife in order to “start” the rod into the hole. It’s a very tight fit, it needs to be. You won’t need the 2 nuts for the remainder of this project but you will need that lock washer.
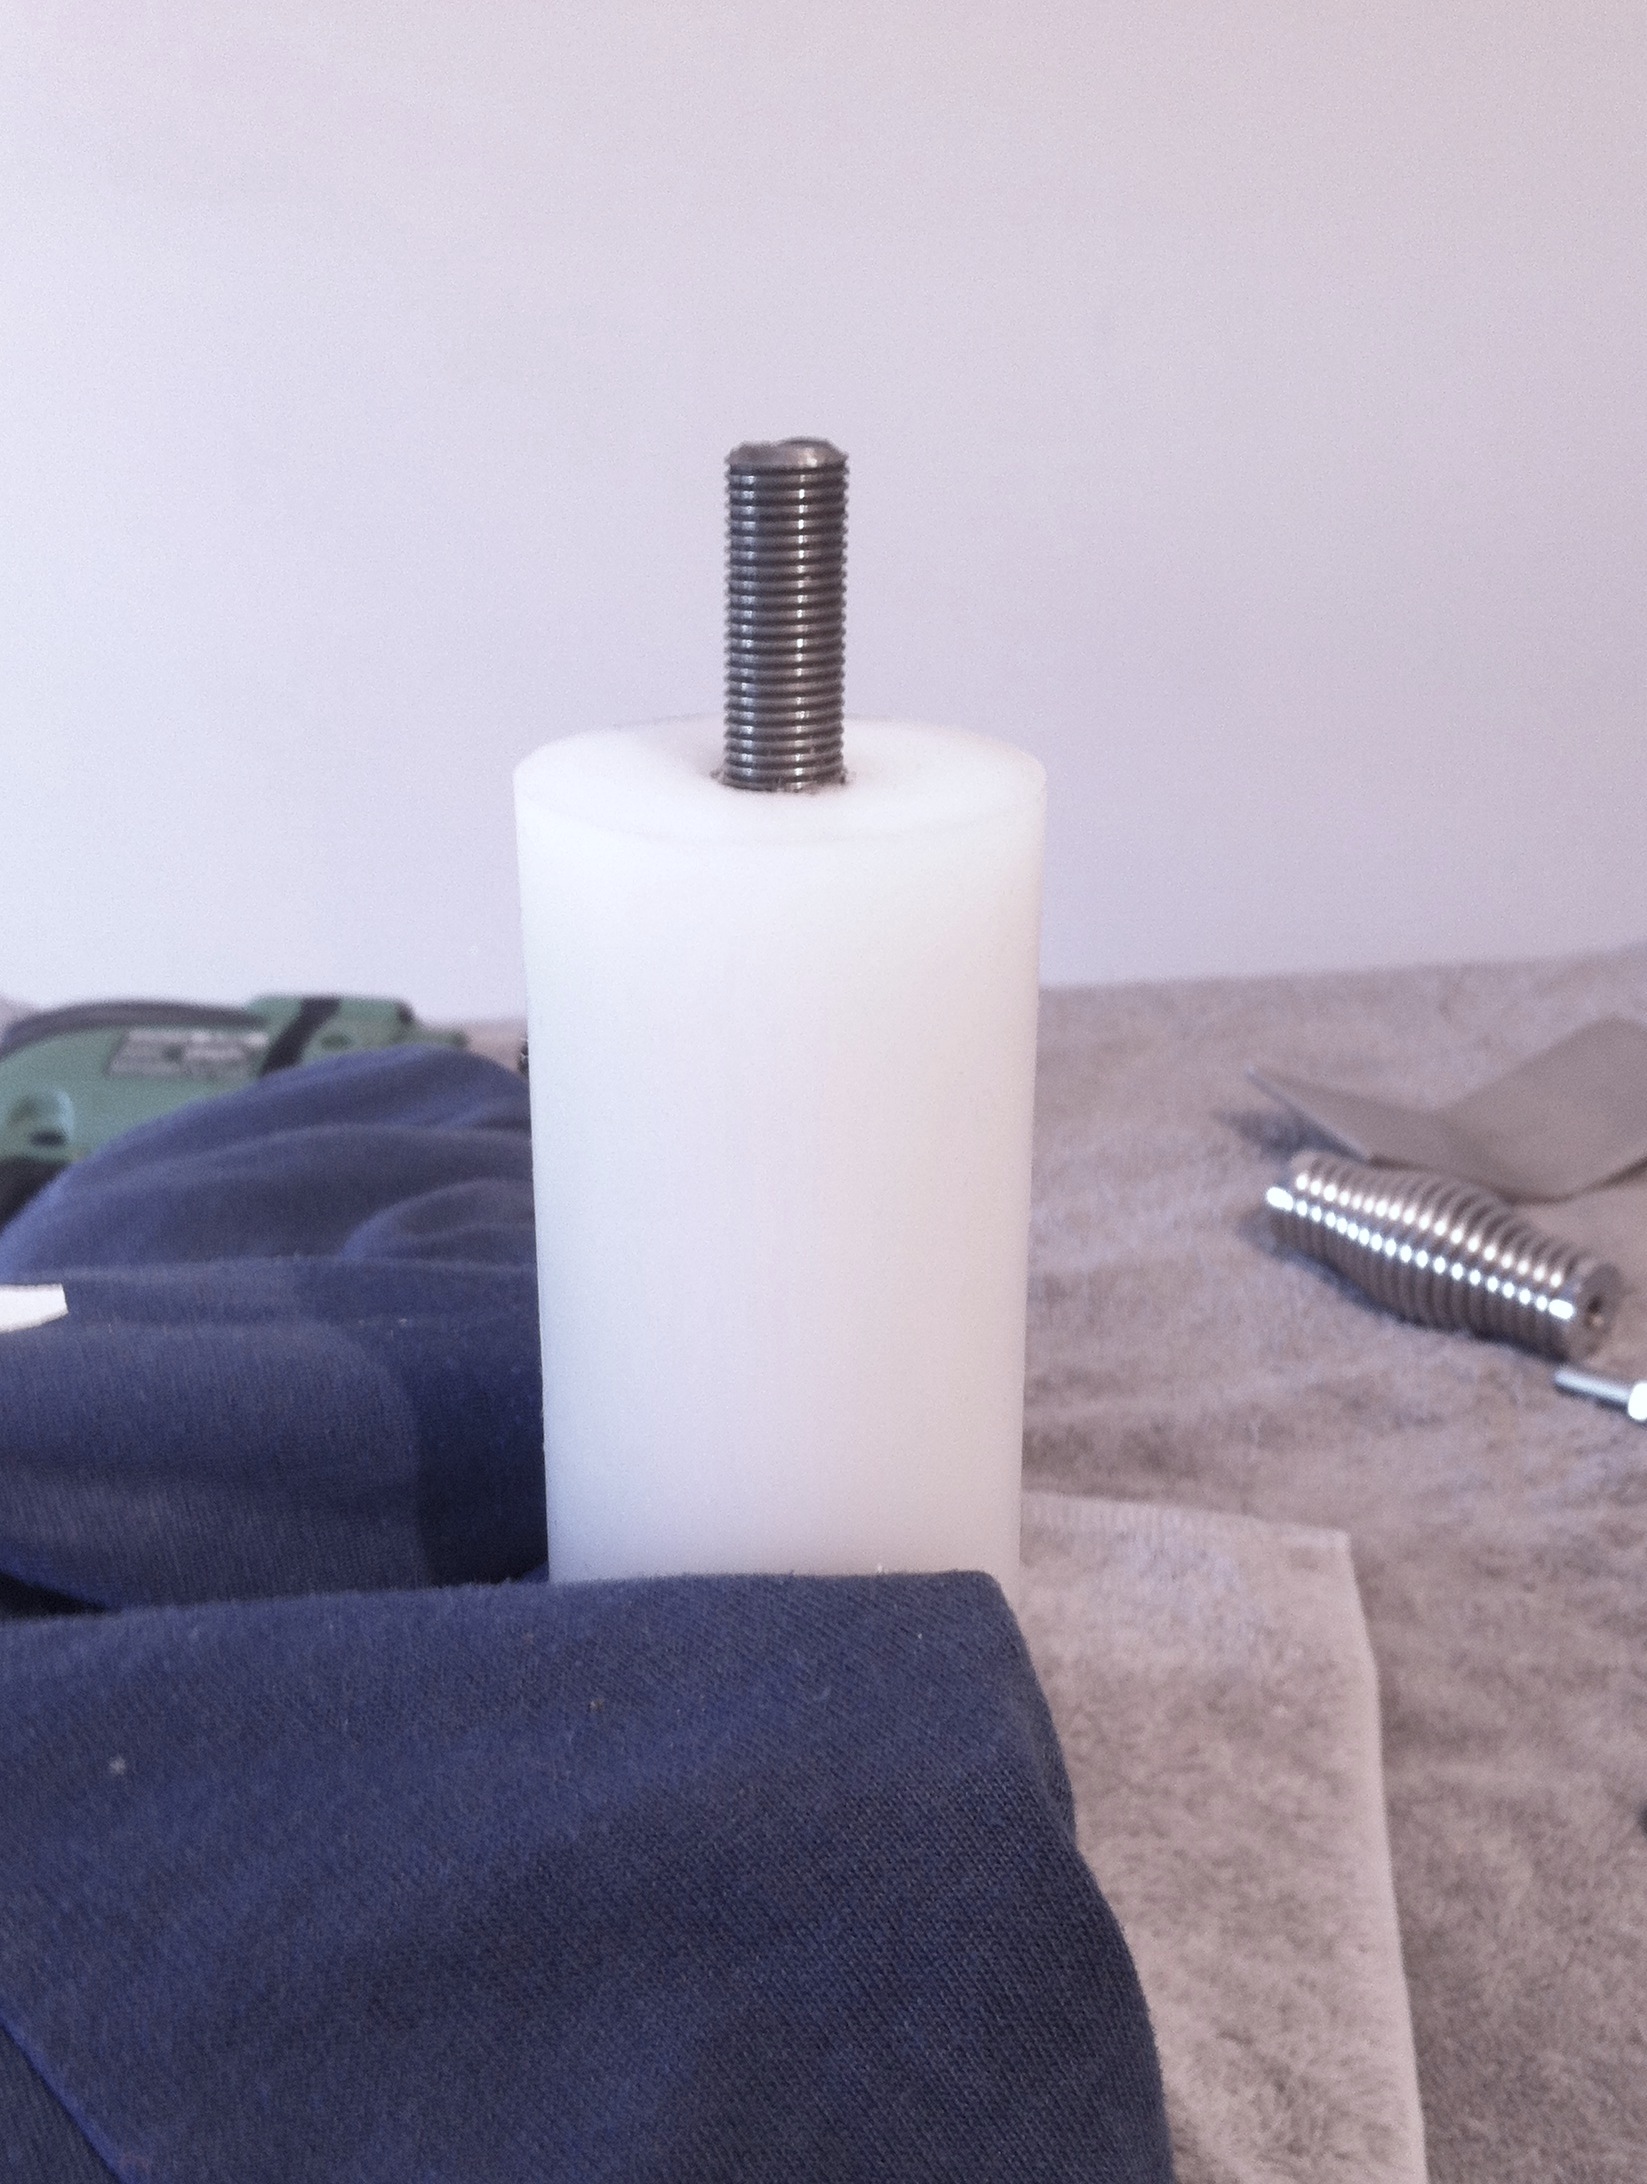 Picture 3. This is the rod (spring-arm) with the allthread installed. Leave 1″ of rod showing, that’s plenty of depth screwed into the spring even after adding the fender washer.
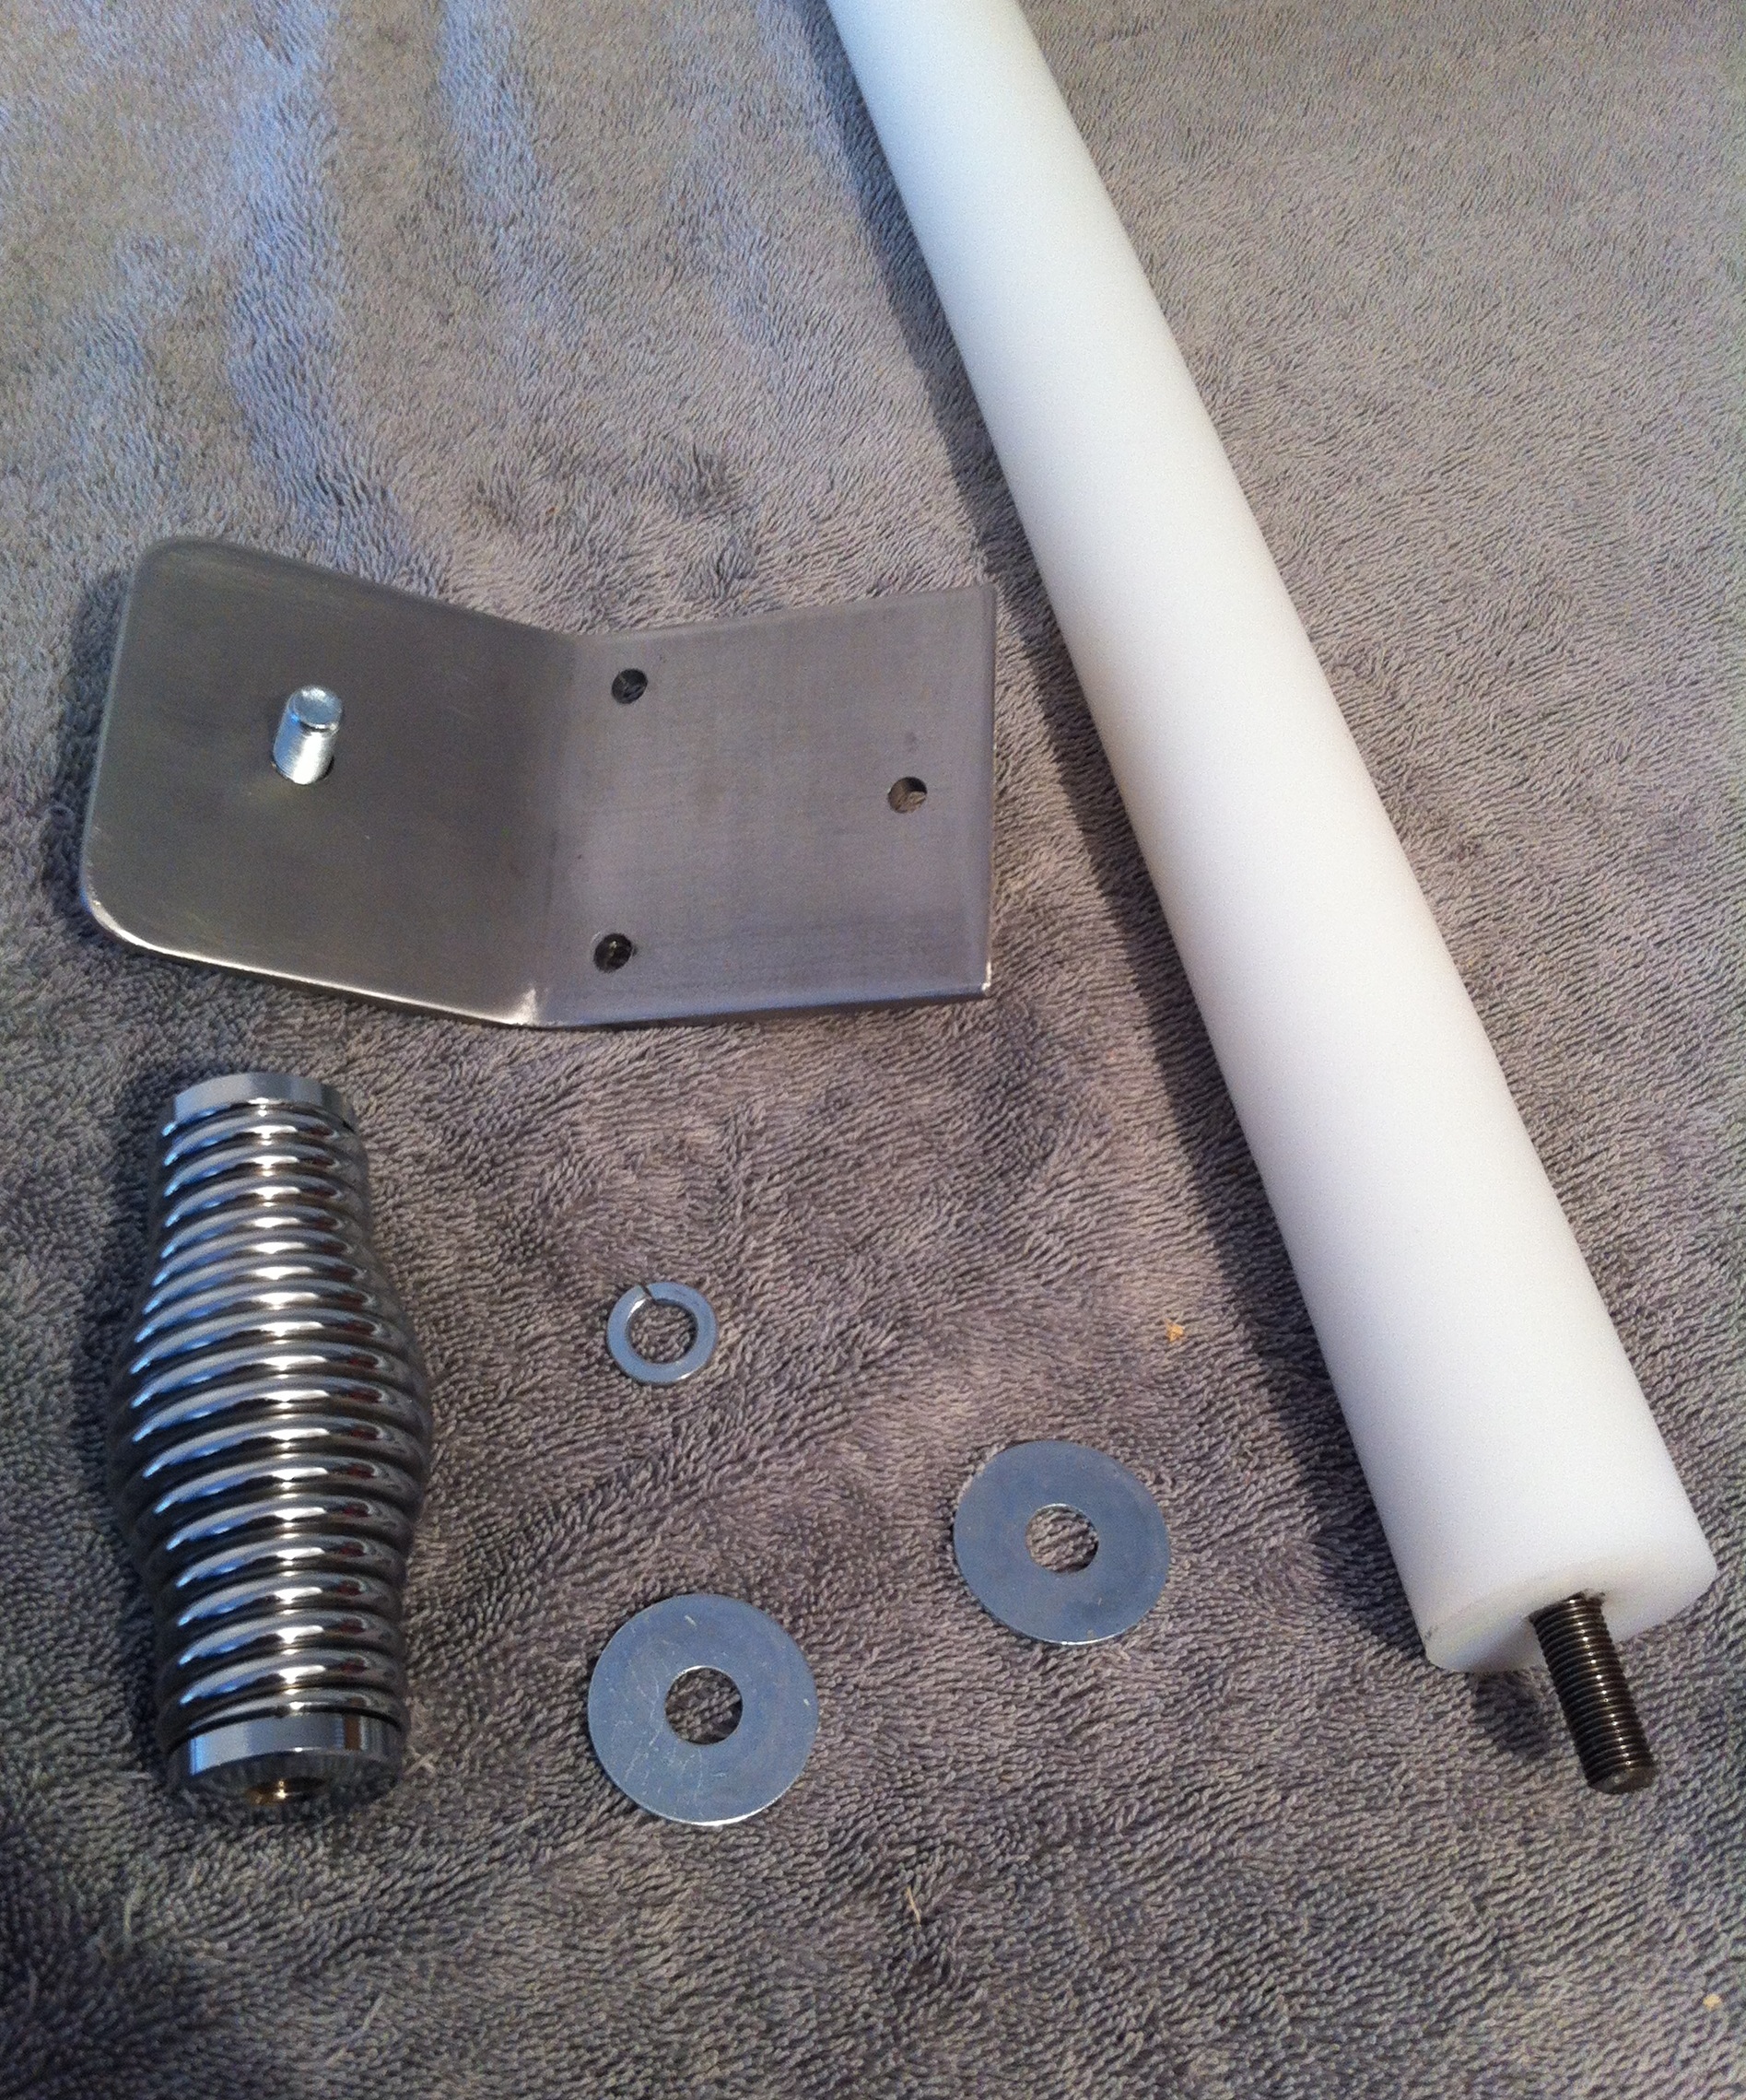 Picture 4. We are ready to assemble the spring-arm. Notice the stainless steel angle bracket is already drilled. I also show the 1″ bolt in the bracket, it’s lock washer is there too but not on the bolt, in the final assembly be sure the lock washer is on that bolt. The holes in the bracket are fairly straight-forward. The 3″mounting” holes are 1/4″ and you don’t need to be very concerned about the spacing, it will depend largely on what/where you mount your spring-arm. Use your judgment in your own application. The 3/8″ diameter hole for the base of the spring is in the center of the lower bracket leg and 1 1/2″ from the end.
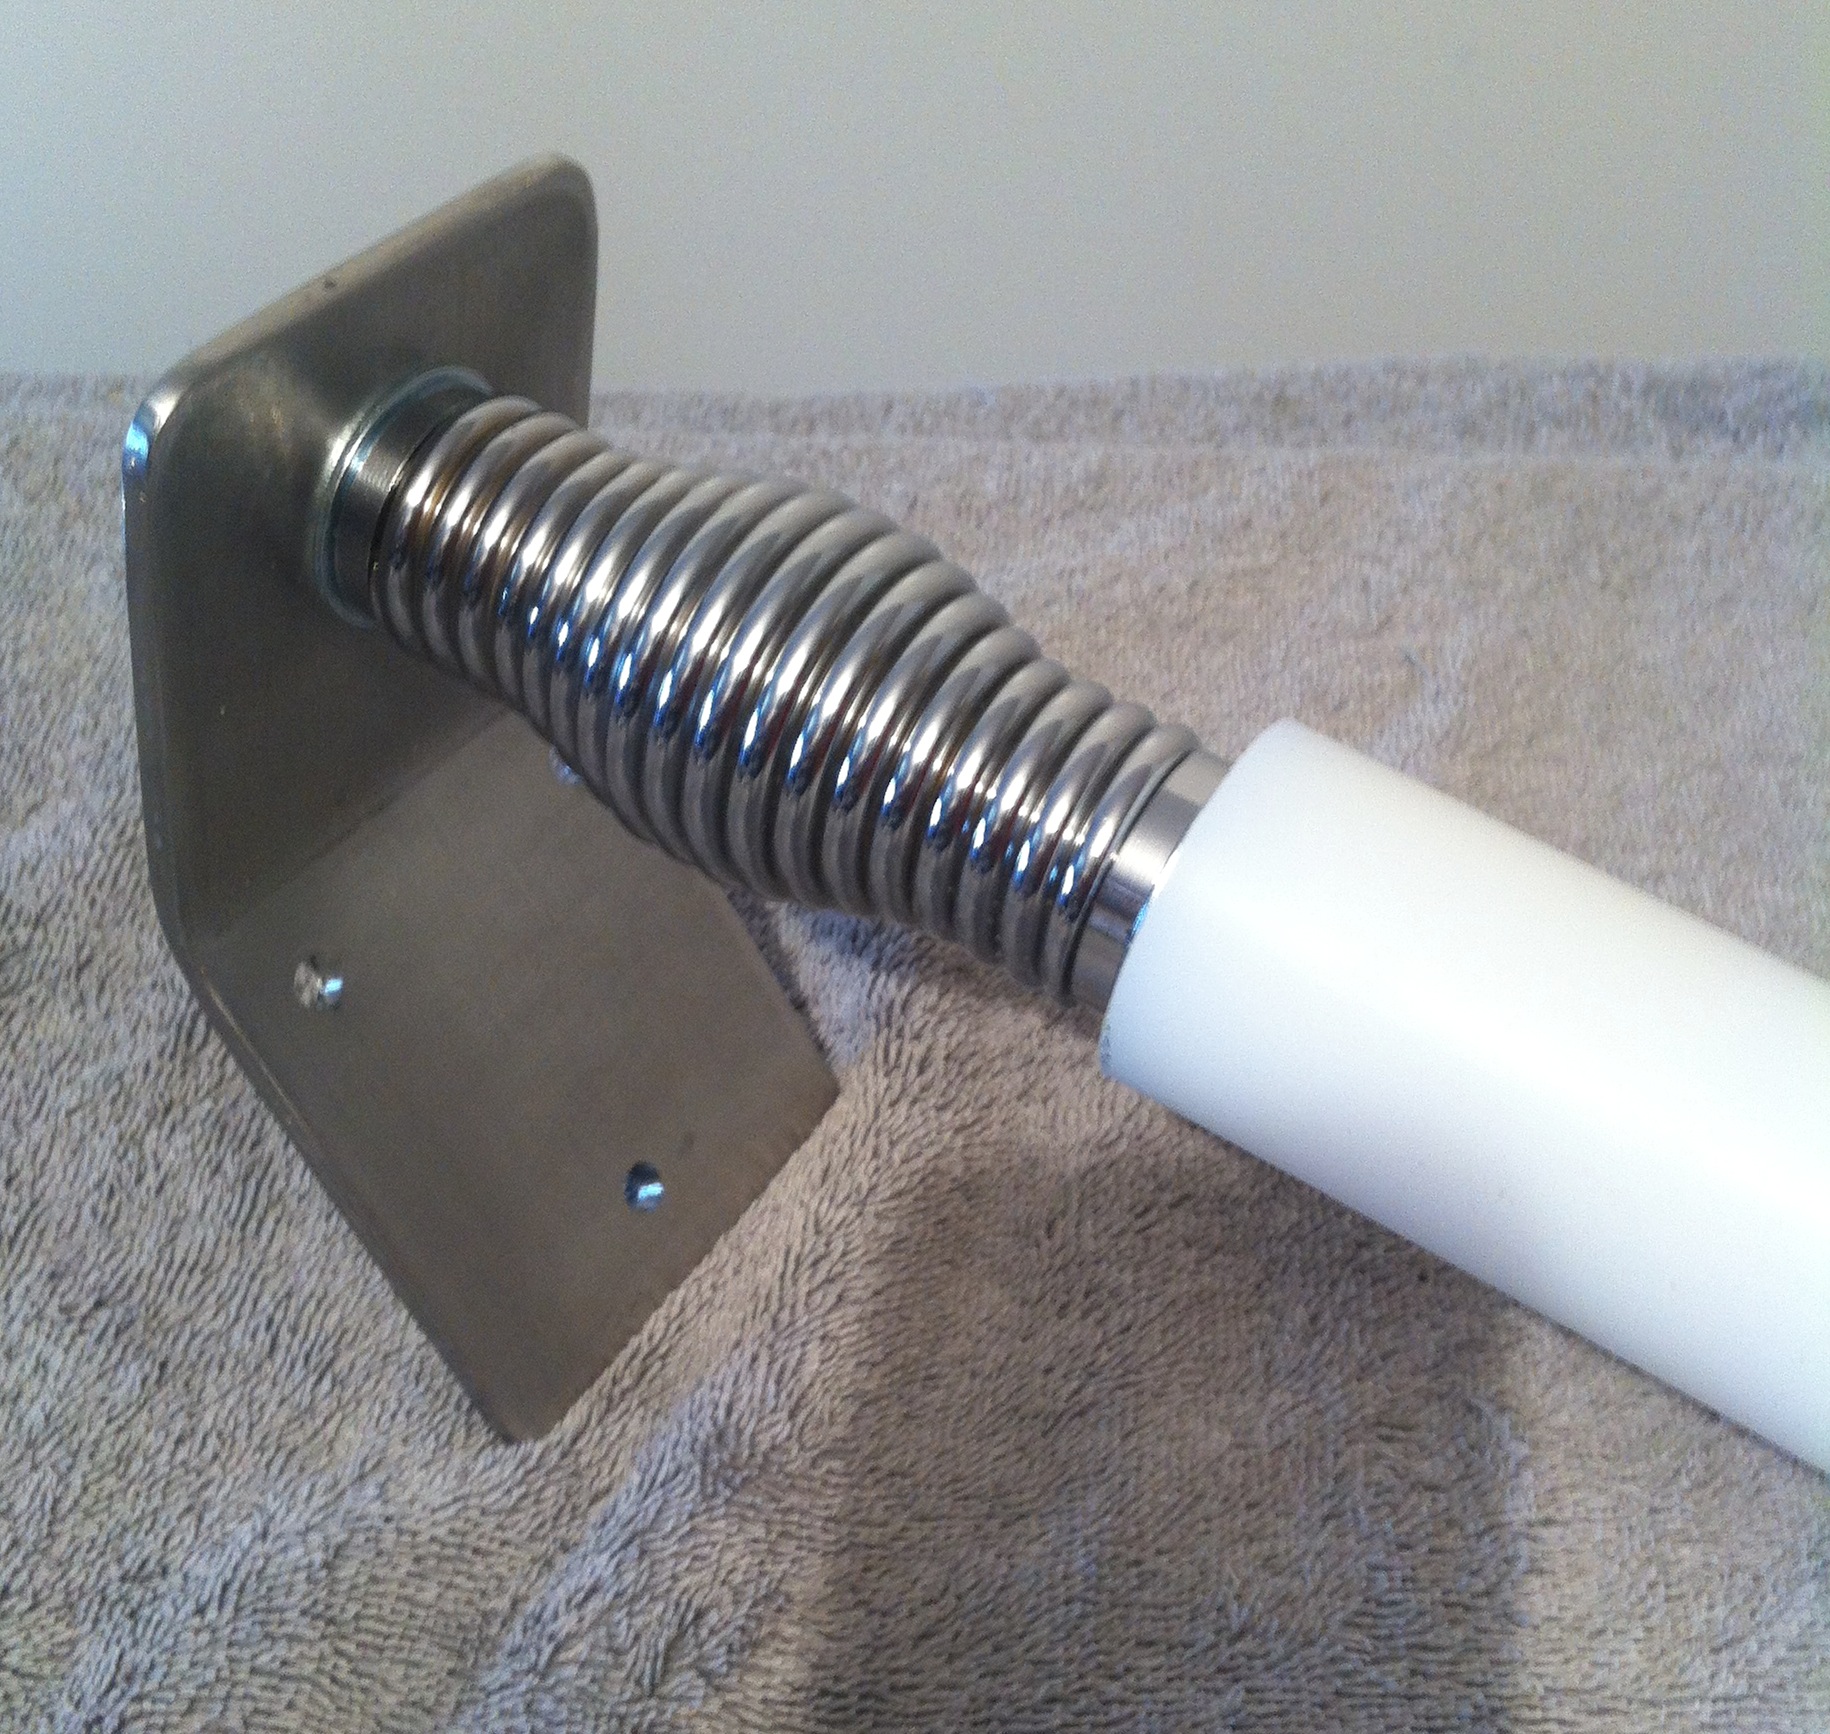 Picture 5. This is a picture of the UHMW rod mounted to the spring and the spring mounted to the angle bracket. I put the fender washers on both ends of the spring, between the rod and the bracket. I used Blue Locktite.
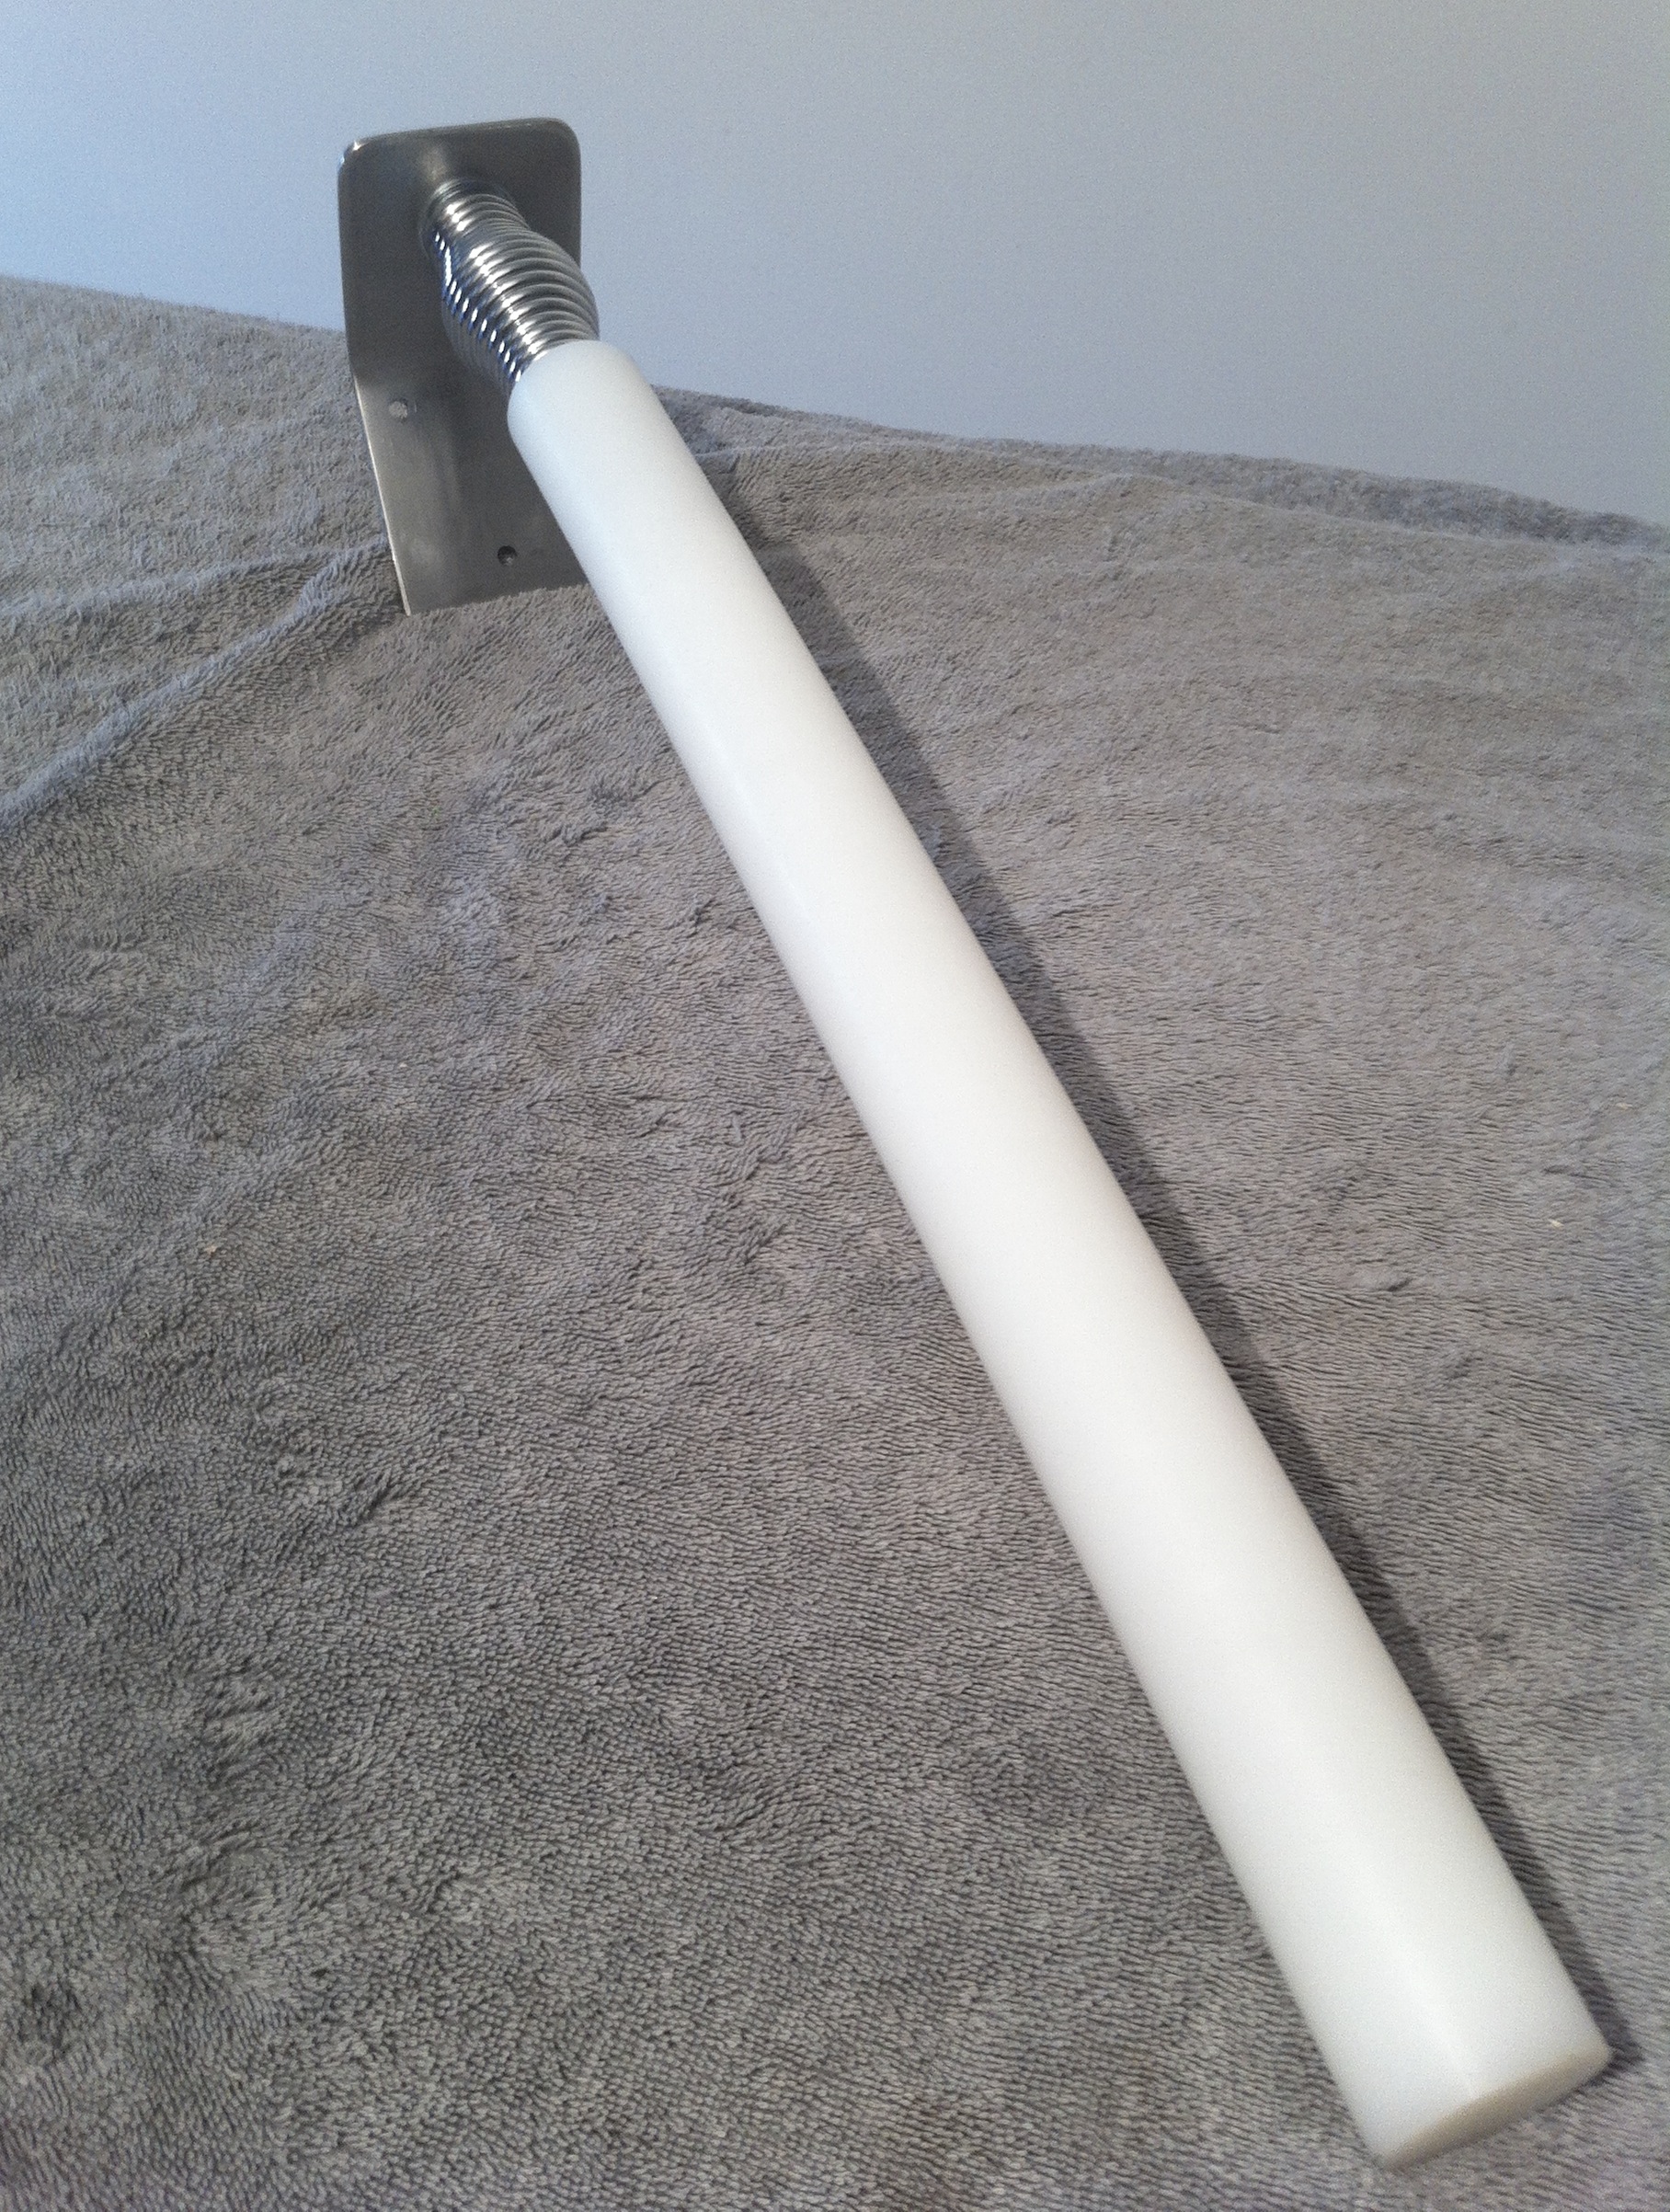 Picture 6. A picture of the entire spring-arm fully assembled! The end of the spring-arm should be rounded, to protect you from injury in case you accidentally contact the end of the arm during training. A later picture shows the arm rounded. I used a hand grinder and shaped it. Sweet.
 Picture 7. This is the everythingwingchun 2-section rice bag I used for both of my projects, mounted to a piece of 1 1/8″ plywood under-layment. The spring-arm is not mounted yet.
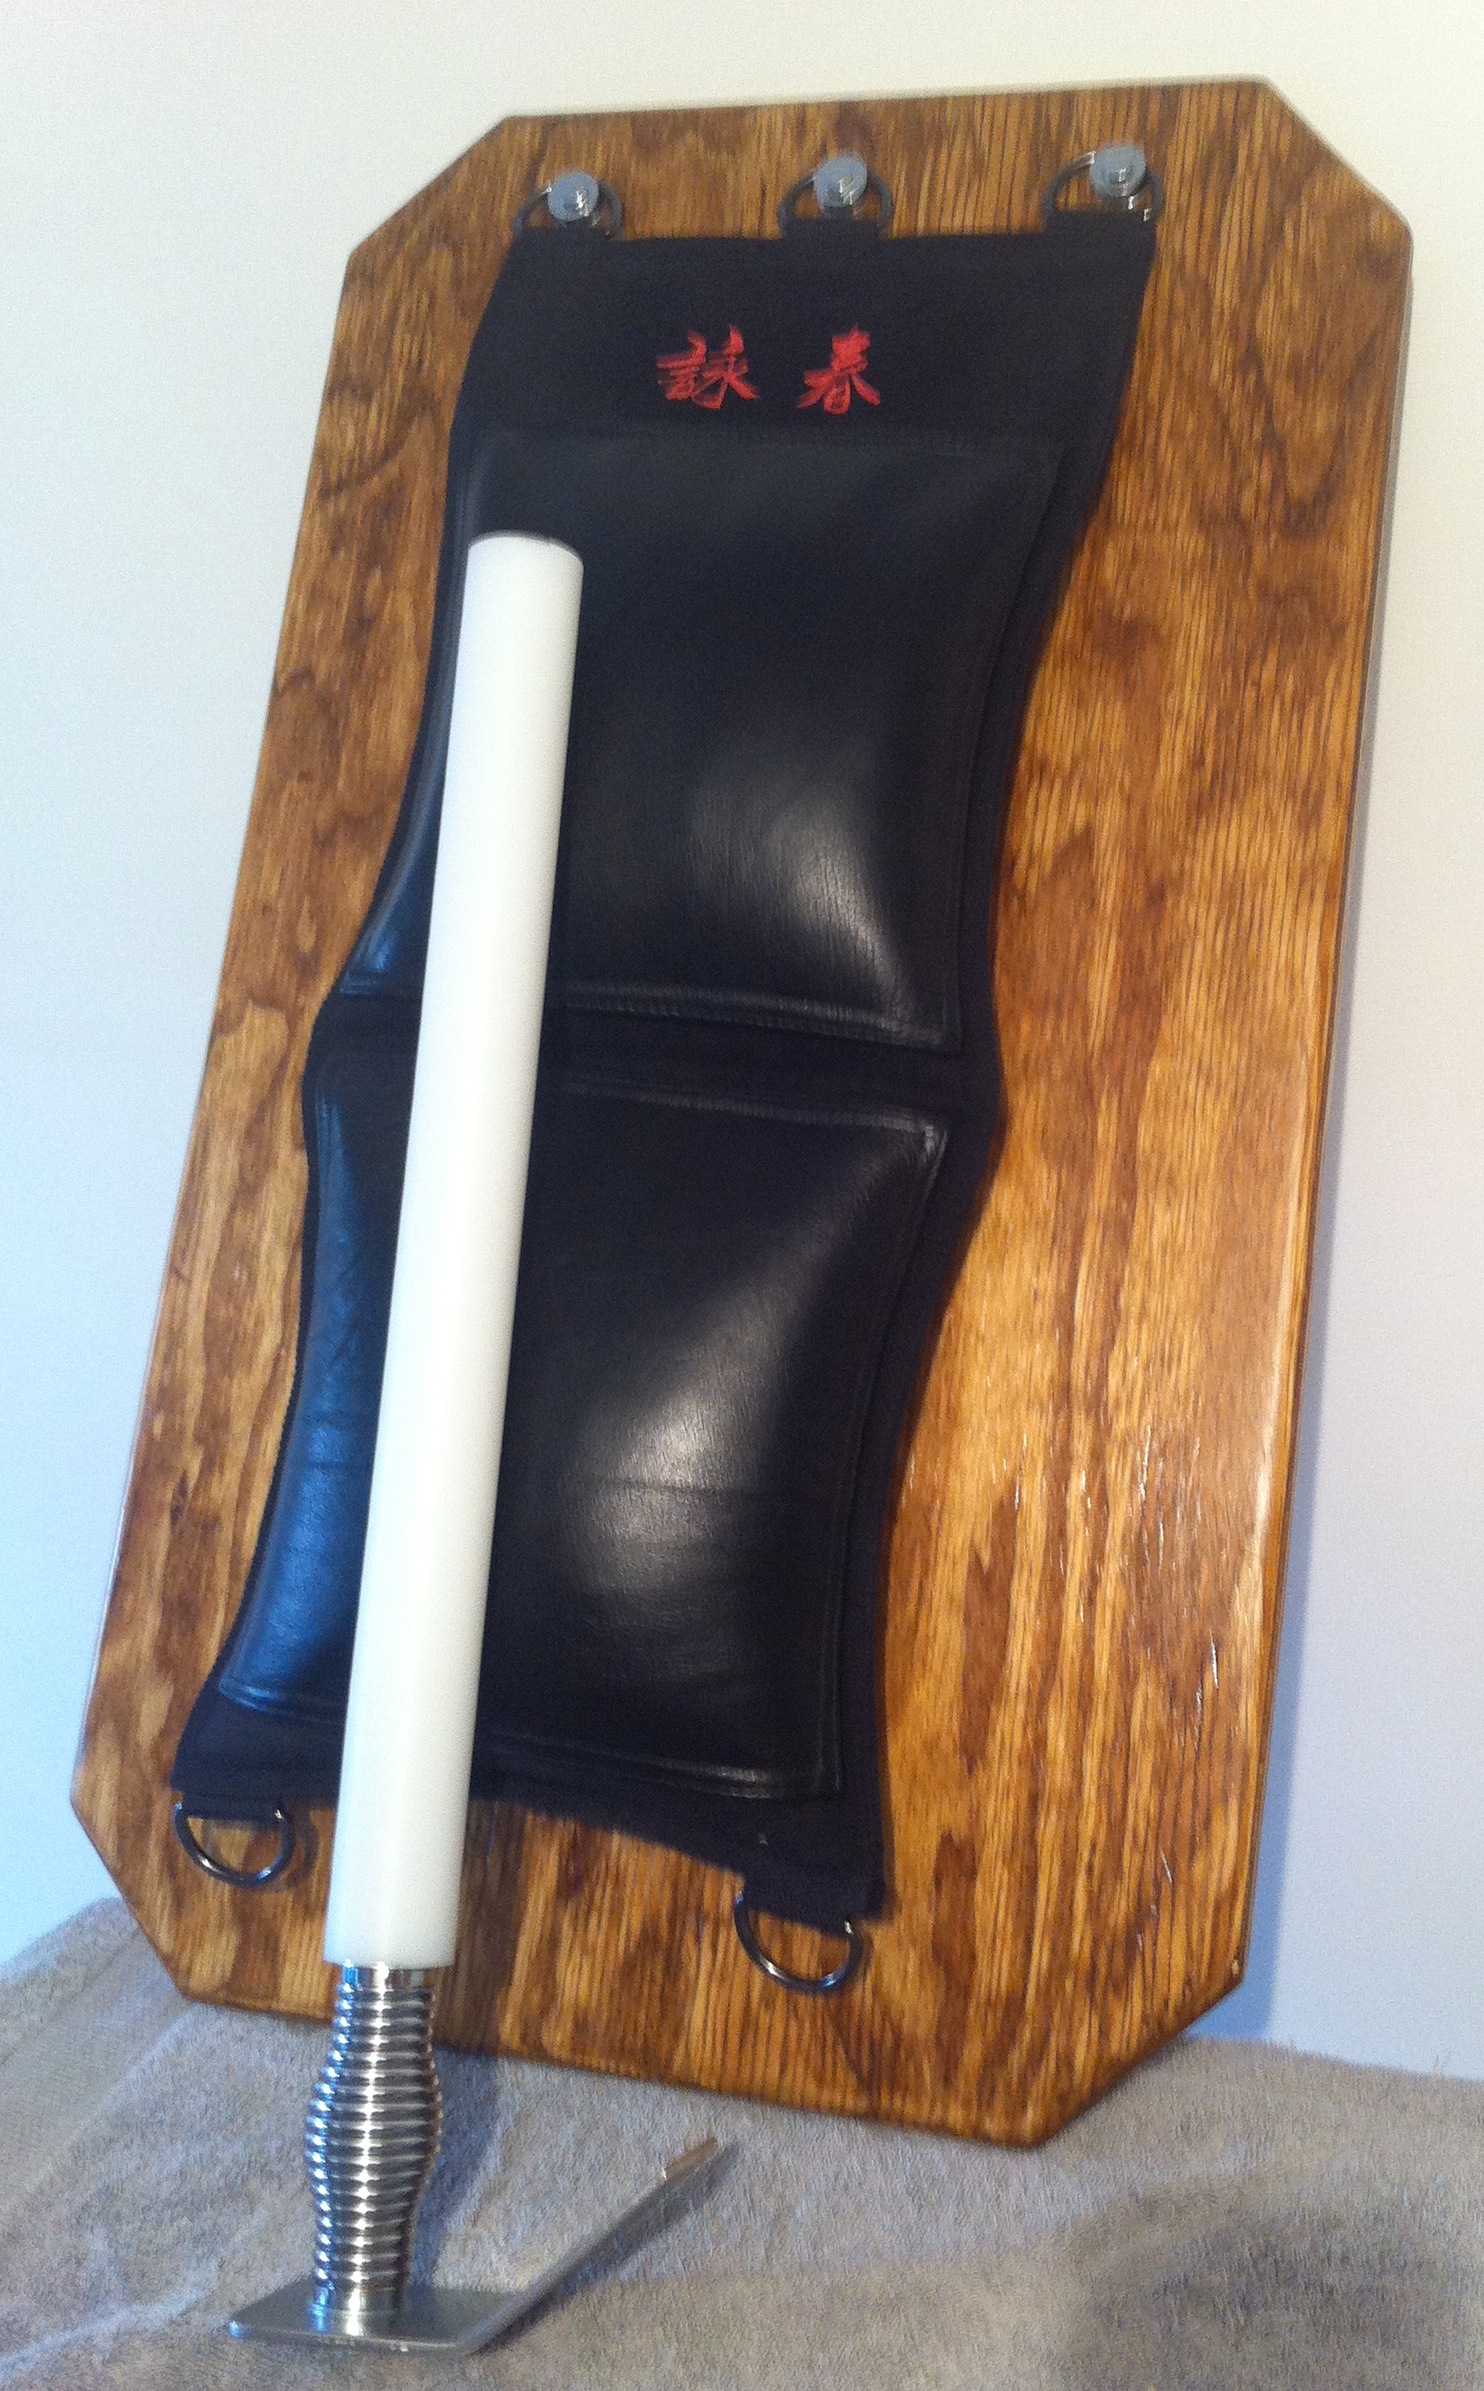
 Picture 8. This picture shows the correct position of the spring-arm in relationship to the rice bag. After experimenting a bit I feel this is about right. Your opinion may lead you to change the position you mount the arm but this is a good starting point. I chose this style/type of rice bags because I already had the bags and knew that I liked them. Sweet.
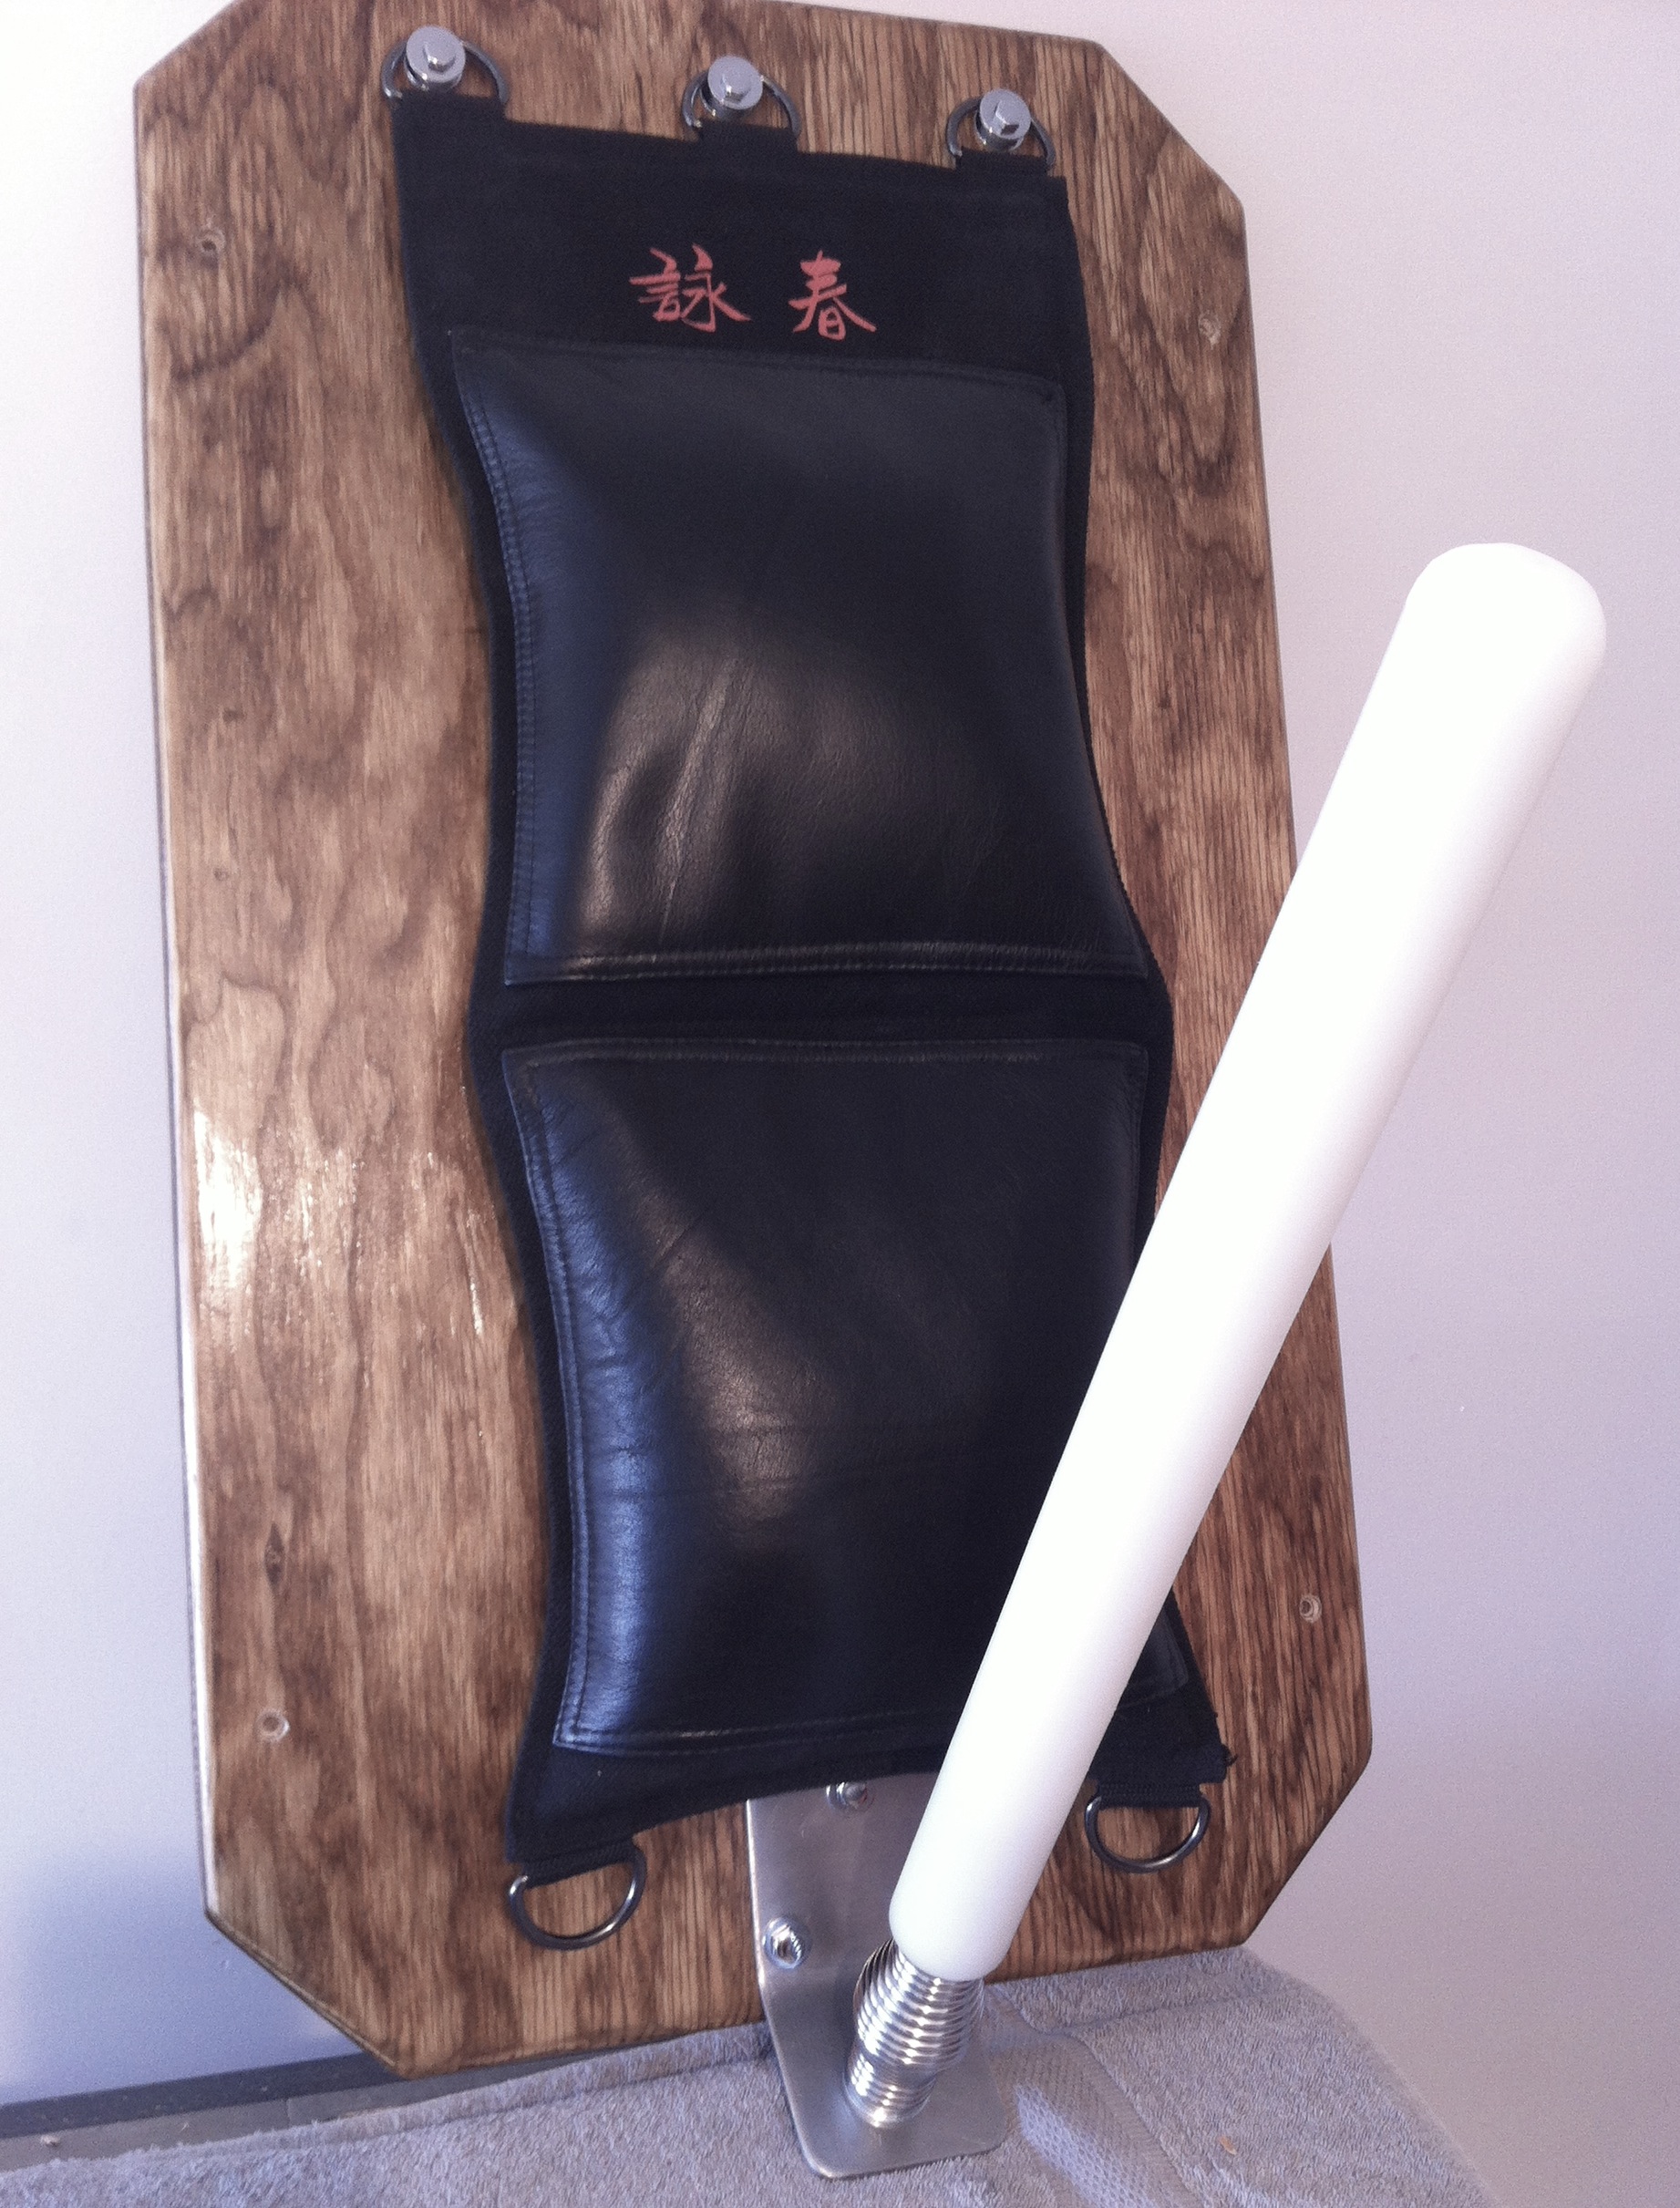
 Picture 9. Final picture of our project. This is a frontal view. I tried different lengths of UHMW rod before I settled on 18 3/4″ in overall length. Lengths of 1″ on either side of this didn’t make that much difference. The most significant difference comes from the height your mount the entire unit. I mounted my finished trainer so that the rod is roughly at the bottom of my chin, a little higher or lower didn’t change much. I am 6′-1″, so this height may be too tall for people who are shorter. You may find a different height is more right for you. Experiment. In our kwoon we mounted the unit slightly lower than the one I have at home and the rod is 3/4″ shorter as well. This seems to work best for most of us in our class.
Congratulations on your finished project!
Good luck! Train hard!
John Cook
Esta a la venta????
No, it is not for sale. The article is telling you how to make your own. If you want to buy something similar, you can try this one:
http://www.everythingwingchun.com/Training-Station-The-Rice-Bag-Training-Station-p/-myj-wma-ricebag.htm
Can You Post The Links For The Parts ?
The parts were purchased at the maker’s local hardware store. I have asked him to post more detail on them for you.
I’ve been asked to source the parts in my tutorial. The spring was purchased from Access Electronics in Bushnell, NE (this info is in the tutorial). The 3/8-24 all-thread is not something you cannot buy at bulk-stores or even Ace Hardware, it can be purchased at most machine shops, I paid $1 each for a 4″ piece. The stainless steel bracket was cut from 3″ x 3/16″ (6″ long) flat-stock and bent at a 45 degree angle and was purchased at the same machine shop. I also purchased my UHMW rod from them too. All of the major plastic dealers I found on the net wouldn’t quote me a price for such a small piece. The same machine shop also had the UHMW, I bought it there too. My town only has 16,000 people and my local machine shop had everything I needed. You can always find plastic rod by doing a search for “Plastic” and adding your city. As a side note, I have been experimenting with the UHMW rod and find that it moves faster under use if it is lighter. I learned this by drilling a 9/16″ hole in the center of the rod. I only drilled it about 9″ deep because I was drilling it by hand and was not sure of the straightness. Hope this helps. Train hard!
Please excuse my mistake above. I hastily hit “send” without my usual 3 proofreads. You CANNOT buy that size allthread in box stores or Ace Hardware-type stores. Most machine shops will have it in stock. Sorry for any confusion!
I was able to get a 2 foot section of the UHMW rod from amazon for about $20. What are the dimensions of the plywood used?
The size of the board is relative, it depends mainly on the size of your rice-bag. For a reference mine are 15″ x 31″. Train hard
Just a heads up for everyone,
A great thing to use to make your arm is a pvc 50cm rolling pin,
Ends are rounded as well And is very cheap.
Hope this helps.
Matt.
Great idea Matt. Thanks for sharing it!
Hello mate,,Roman here from Australia,,great DIY project,,i am almost finshed,,just have to have the spring fabricated for the training arm.i have just one question,i can’t seem to get the two bag wall bags from everything wing chun,,they only seem to come in the one or three but not the two wall bags,,i have looked on other sites but none even comes close to the great quality of everything wing chun wall bags,,,any suggestions???
Roman, Must people use the EWC single section bags. If they want 2 sections they put 2 singles up. You have to be careful with the way you hang the second (U shaped nails are good), but the bags last longer. The 2 section bags were nice, but few few people actually used them. Hope that helps some.
Can you use a wood dowel I stead if pvc for the arm?
You can, but some people find wood to be too hard with a spring snapping it into place with force. So it depends on the density of the wood, how well conditioned your arms are, and the power of the spring.
I train on my jong as is and I like arm Conditioning. I understand as a store you all sell things to make money but I loved the fact that you all included this to help people as well. I will make sure I order anything from you all in the future.
Great idea!
Whats the punching bag sort/brand?
It is an Everything Wing Chun wall bag:
http://www.everythingwingchun.com/wallbags-wing-chun-s/109.htm
Can you make a vid of the final project in use? I’m especially curious to see the springtime springy-ness of the arm.
Hi everyone, I’m considering making one of these myself. I’m wondering if there have been any improvements/updates after using the device for a while that anyone can share? Thanks in advance.